Wednesday, June 19, 2013

Strawberry Bars with Sugary Lemon Glaze

One word.

AWESOME.

I have to thank Bakeaholic Mama for her recipe.  I made a batch for work and a batch for my family and I honestly probably ate the majority of both pans!  I got so many compliments on these and they came out perfectly.  I followed her recipe exactly except that I added a lot more strawberries.  Why not?  Amazing recipe!


Tuesday, June 11, 2013

How to Spray Paint Shoes

This is one of my favorite DIY secrets.

When I have a pair of shoes that I absolutely love, I usually regret not buying them in multiple colors.  However, sometimes they don't sell them in the color I want, so I have to do a little creative work.  I actually did this project back in 2007 here, and I saved everything so I could use the supplies again.  This is the pair of Old Navy sandals that I used.  I love the white ones I have, so I wanted a black pair too.  When I found out they didn't sell them in black, I decided to paint them myself.

To find out how to do this correctly, I went to a local shoe repair store and the owner explained the best way to do it and gave me the supplies to use.  If you'd like to try this, I'd suggest buying similar supplies made for shoes so that you know the product will work well.  First, I started with the color preparer and some rubber gloves.  I poured a little on an old rag and wiped down the sandals straps.  This is used to strip down any dirt, grease, or finish from the straps.

I found a roll of painter's tape that I used to cover up all the areas that I didn't want painted.  This takes a little time, but it's worth it to get the paint where you want it.

I stuffed newspaper inside the sandals just as an extra precaution to make sure no paint got on the inside of the straps.

I used Meltonian color spray from the shoe repair shop to spray the shoes.  It took about 3 coats to make sure I got all the little crevices and straps completely covered.

When I ripped off all the painter's tape, I had my perfect pair of black sandals!

I love them and they came out perfectly!  If you're concerned about the color staying, I'll vouch for the shoe spray I used because the ones I did back in 2007 still look perfect like they did when I first painted them.

Monday, June 3, 2013

Burp Cloth Cupcakes

I've been dying to make these for a couple years now. I loved the homemade burp clothes I made for myself, so I figured I'd make more for some of my friends who were pregnant.

I made the burp clothes from flannel - see the tutorial here. It's super easy and quick to do which is great when you have a little one to take care of at the same time. (If you don't want to make your own burp clothes, you could always buy some too.)

Then I folded each burp cloth and pressed the folds with an iron. (Yeah, my leopard print ironing board cover really sucks for photos, but I love it!) First, I folded each side towards the middle.

Then I folded again and ironed the cloth to flatten it.

I tightly rolled each burp cloth.

The ends are pinned with two stick pins.

To add some extra color and fatten up the cupcakes, I cut out some strips of felt using a pinking shears and wrapped them around each burp cloth roll.

I added another layer of fabric on top of the green felt too.

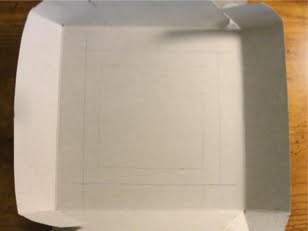
To make the cupcake box, I found one that fit the "cupcakes" pretty well. Since it didn't have an opening to show off the goodies inside, I adjusted it myself. I took the top of the box and measured a square in the middle to cut out.

Using an exacto knife, I cut out the square opening.

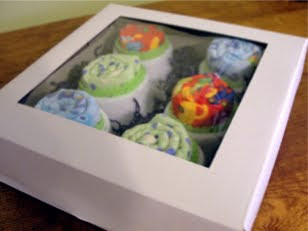
I had some cellophane left over from another project so I used a small piece and taped it along the edges.

I placed each cupcake in a cupcake cup and added some fun blue confetti between each one.

Wishing the mom a *sweet* little boy when he arrives!


Related Posts with Thumbnails