Wednesday, April 17, 2013

Painted Bathroom Rules Signs

Now that Connor is getting to be a big boy, I'm starting to plan for the future.  He's going to be taking baths in his own bathroom and learning to brush his teeth.  We plan on renovating his bathroom/guest bathroom eventually, but for right now, I wanted to make it a little more fun and colorful for him.  I love the bathroom rules signs I've seen and he's going to be at the perfect age to start learning these things soon.

I printed out some simple images with text that I thought would look cute on the signs.  (Please forgive my crappy photos. The lighting must have been really bad when I was working on these.)  I bought four 12" x 12" canvases to transfer the art on.

This is my secret way to transfer art.  I take a pencil and scribble over the back of the paper that has the design on it.

Then I place the paper right onto the canvas and center it exactly how I want it to be.  Then, I use a mechanical pencil without the lead to trace around the design.  When I lift the paper, the design will be transferred onto the canvas!
I spent many, many hours watching tv and painting three coats on each canvas to make them really bold, but it was worth it!
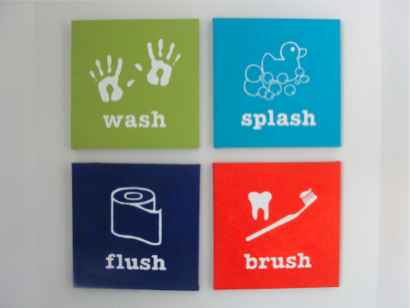
I love how they turned out!
And since I'm matchy-matchy, the shower curtain colors go perfectly with the art.

And the comfy green rug matches too!
  I can't wait for Connor to use his new, updated bathroom!

Monday, April 8, 2013

Fabulous Chocolate Cake

I have to AW my Hubby for baking me this amazing chocolate cake with chocolate frosting for (plus spaghetti, meatballs and homemade garlic bread) for dinner one day! Trust me, this cake is the BEST!

From Hershey's "Perfectly Chocolate" Chocolate Cake

Chocolate Cake:

  • 2 cups sugar
  • 1-3/4 cups all-purpose flour
  • 3/4 cup HERSHEY'S Cocoa
  • 1-1/2 teaspoons baking powder
  • 1-1/2 teaspoons baking soda
  • 1 teaspoon salt
  • 2 eggs
  • 1 cup milk
  • 1/2 cup vegetable oil
  • 2 teaspoons vanilla extract
  • 1 cup boiling water
  • "PERFECTLY CHOCOLATE" CHOCOLATE FROSTING (recipe follows)

    Heat oven to 350°F. Grease and flour two 9-inch round baking pans.

    Stir together sugar, flour, cocoa, baking powder, baking soda and salt in large bowl. Add eggs, milk, oil and vanilla; beat on medium speed of mixer 2 minutes. Stir in boiling water (batter will be thin). Pour batter into prepared pans.

    Bake 30 to 35 minutes or until wooden pick inserted in center comes out clean. Cool 10 minutes; remove from pans to wire racks. Cool completely. Frost with "PERFECTLY CHOCOLATE" CHOCOLATE FROSTING.
Chocolate Frosting:
  • 1/2 cup (1 stick) butter or margarine
  • 2/3 cup HERSHEY'S Cocoa
  • 3 cups powdered sugar
  • 1/3 cup milk
  • 1 teaspoon vanilla extract
Melt butter. Stir in cocoa.

Alternately add powdered sugar and milk, beating to spreading consistency.

Add small amount additional milk, if needed. Stir in vanilla. About 2 cups frosting.


This cake is addicting! Absolutely fabulous!

Monday, April 1, 2013

DIY Embroidered Luggage Tag


I always see these cute luggage tags in stores and they charge so much for them. Why pay a lot when you can make them yourself? I decided to make one for my sister and one for Connor to hang on his backpack for daycare.

You hardly need any fabric at all, so it was nice to use up some scraps. I started out making the strap from a long & skinny piece of fabric. (I don't really think the measurements are very crucial, so I just used what I had.) I started by folding each side towards the middle and ironing the creases.

Then I folded again and pressed the crease.


For the tag, I cut out two small rectangles and one piece of batting
I pinned the piece of batting to the back side of the fabric.
This cursive font is works really well for embroidery, so I printed out the text to fit the tag.

I used embroidery floss and a thick needle to embroider the name on. It seems hard to do, but it was actually very easy to sew just by using some tutorials I found on YouTube and Google.
Once the embroidery was done, I pinned right sides together and got the strap ready to go.

I placed the loop of the strap inside and the edges outside so it will work correctly when it's turned right-side out.
Only 30 seconds on the sewing machine to stitch the outside edges together and I left one side open.
I turned it right-side out and then folded over the edges to close the tag.

It came out so cute!


Connor's is made with flannel and uses a shoelace-type strap.


Related Posts with Thumbnails