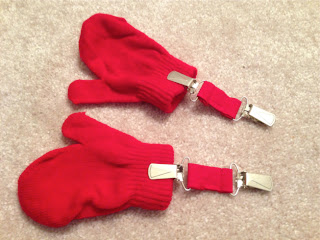
If you've got young kids, you probably deal with missing mittens and gloves all winter long. I really didn't think I'd have this problem with a 16 month old, but a little toddler is not really ready to keep track of his own mittens at daycare! Anyway, these old school mitten clips I made him have made my life a lot easier and I'm not freaking out about missing mitten every other day. Once I made a set for him, I'm happy to say we haven't lost a mitten since!
This whole thing took me about 15 minutes - max! I cut out a long piece of fabric that was about 3 in. x 16 in. I folded it in half longways and ironed the crease. (You could also use ribbon to avoid doing the fabric and ironing, but I feel like fabric is a little better for a rough boy!)
Once the fabric cools, fold both ends towards the middle crease that you just made and iron again. Now you have a thin piece with the unfinished ends hidden.
Pin the fabric strip along the edge and sew the edge to close it.

Once the strip is sewn closed, I cut it in half so I had two shorter 8 inch pieces.
I bought 4 mitten clips at the fabric store. They're usually
located near the sewing supplies like needles, snaps, and zippers and
come in sets of two.
Wrap the end of each strip around the mitten clip and fold the unfinished end under.
The length of the fabric really depends on the age of your child and how long you think would work best. Since my son is still pretty young, I made the straps really short and cut off the excess fabric.
After pinning the fabric, I sewed each side on the machine. It's a little tricky to get the tiny pieces to go through the machine, but I got it to work.
Super easy and they're so cute!
Here's my little model showing off his new mitten clips!
Aren't kids with mittens adorable?
 I'm kind of obsessed with making softies (stuffed animals) so I couldn't resist this cute stuffed dinosaur I found while blogging one day. I adjusted mine slightly by using ribbon loops for taggies instead of her fabric scales. I also added some small jingle bells inside so it rings when you shake it.
 Not sure where I like it best in Connor's room, but I'm sure it won't be displayed for long!


