Sunday, November 29, 2009

Bless You! A cute gift...


I've seen these cute little tissue holders before and have always wanted to make some. Why not try it now while I'm feeling crafty and have gifts to give? They're super easy to make and fun to accessorize.

Start out by cutting out 2 rectangles of fabric. You only need two 6.5" x 7" pieces, so it's a good way to use up some scraps. I picked 2 different coordinating fabrics, but you can use the same one for both pieces if you want.
Pin the pieces together (wrong side out and pretty side in) and saw around with a .25" seam allowance. Leave a space about 2-3" on one of the longer 7" sides so you can flip it inside out later.
Turn the piece inside out so your nice sides are showing.
Press all the corners. (Yikes! Can you tell the lighting in my laundry room sucks? Future reno planned!)

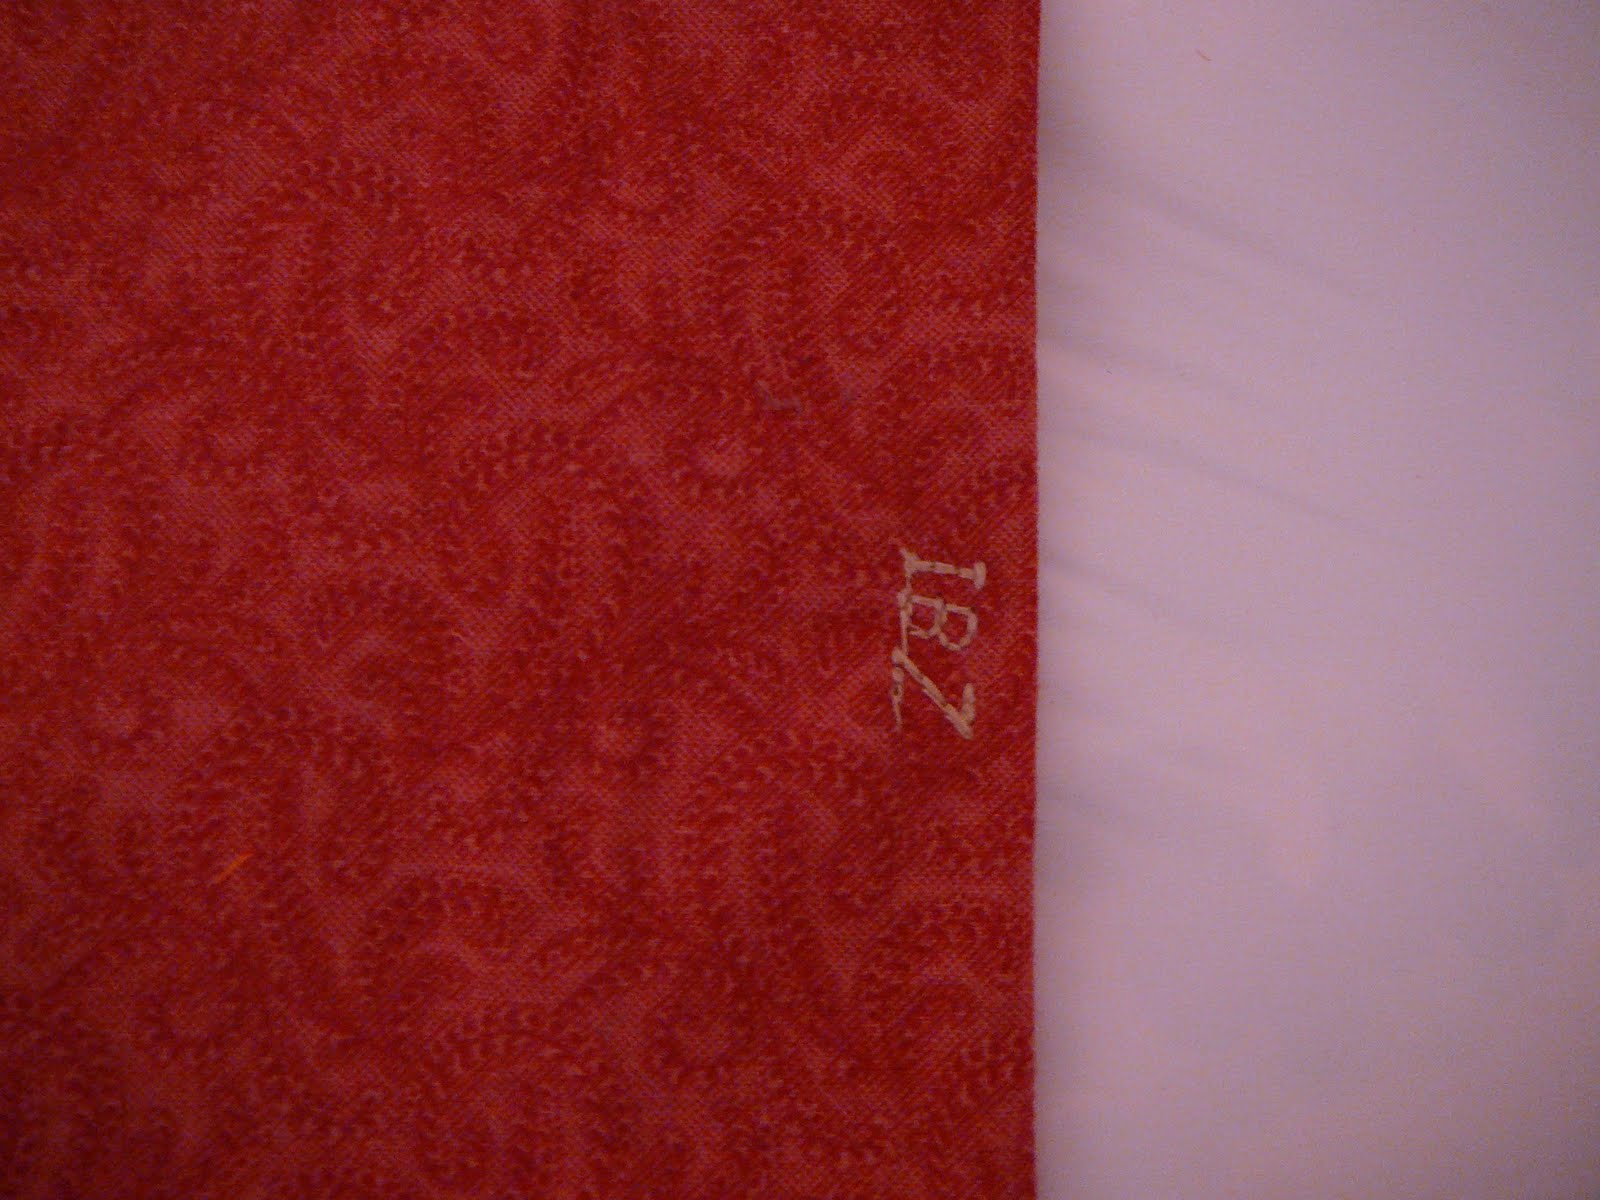
At this point, if you want to add any ribbon or trim, sew that on. Your edges don't need to be finished since they will be covered at the end. I just took some ribbon and sewed a straight line along the middle.

On these other ones, you can see how I used the sewing machine to try a few fun things. I put initials on one and a simple pattern on another.

Pick which side you want to face out at the end. Then fold the long sides in towards the middle so that your chosen fabric is on the inside. Overlap the fabric edges a tiny bit.Pin your fabric. You can see here how fabric I want to show at the end is still on the inside.
Sew across the two sides.
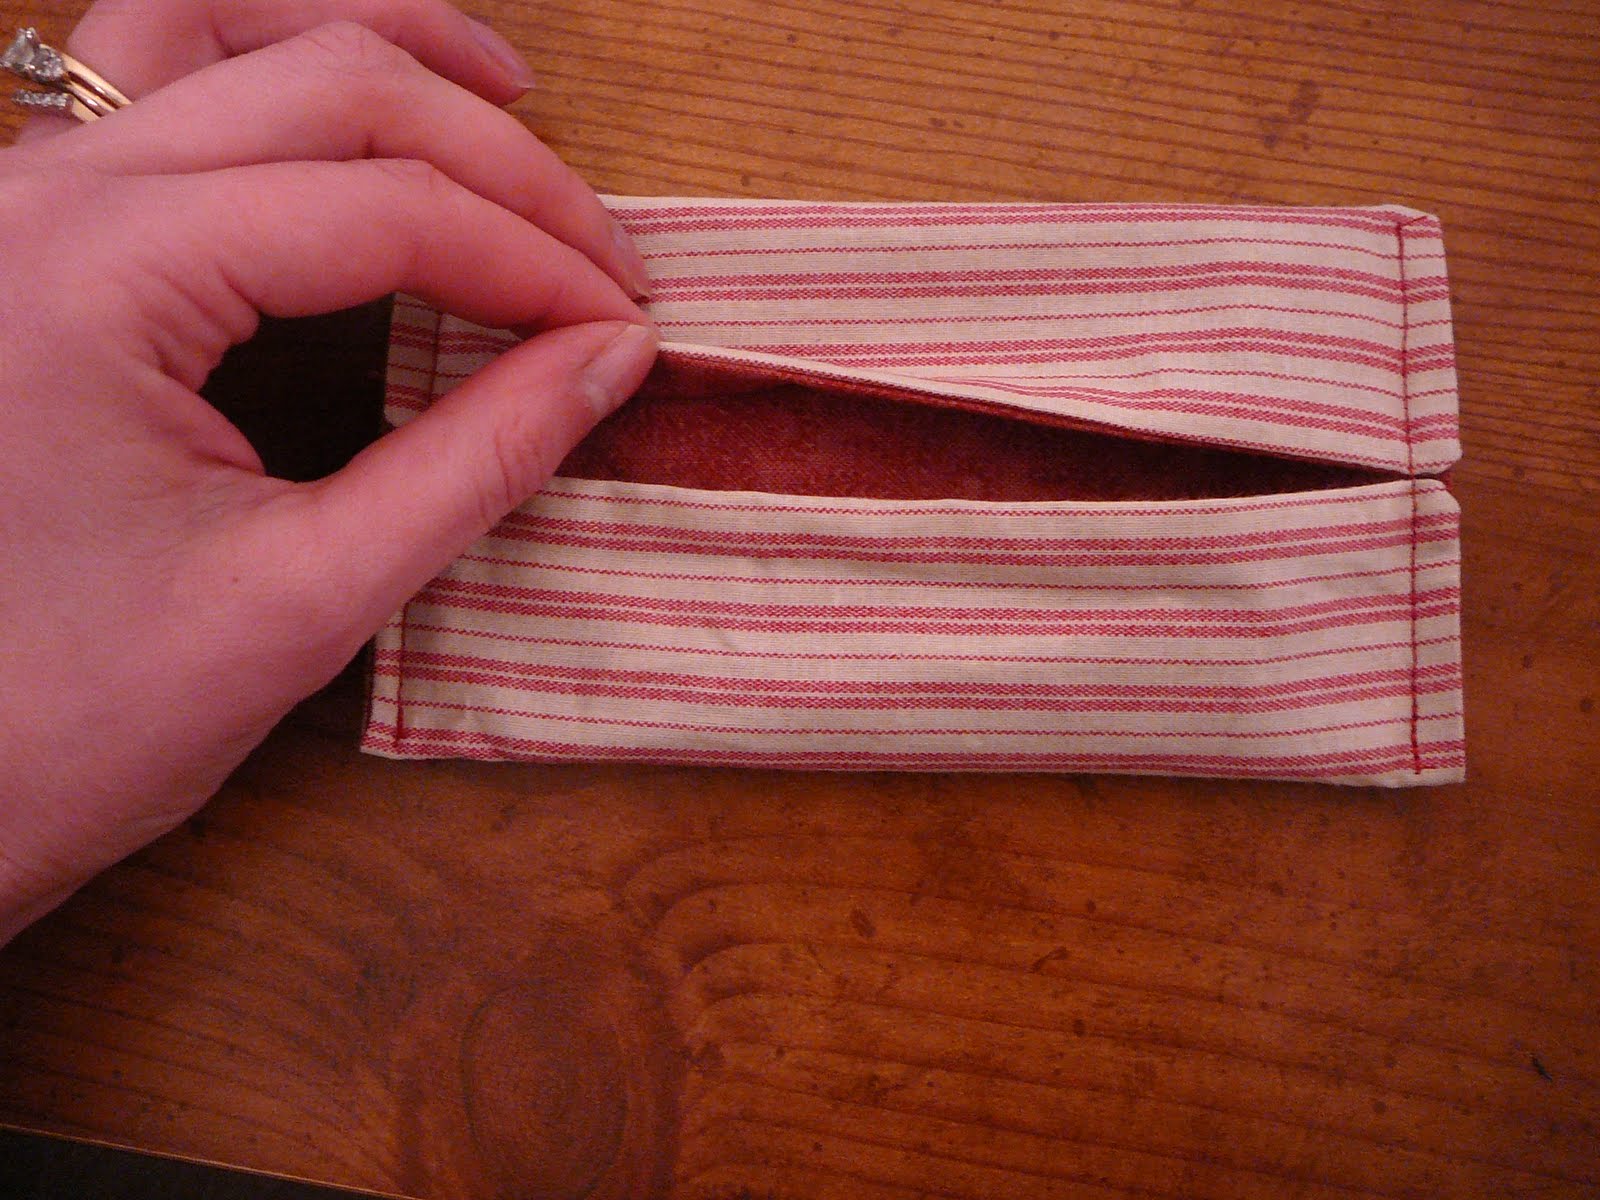
Flip your piece inside out and you can see how the interior fabric will show when you open the case.

Add any embellishments. I sewed little bows on the sides of this one.

Slip your tissue package in and you're done!

Healthy Stuffed Chicken Parmesan

There aren't many vegetables that we both agree on, but spinach is one of them. We tried this recipe for stuffed chicken parmesan with spinach over the weekend and loved it! I found the recipe here.

Beware: this recipe is a little more complicated than it looks. It took 2 people to roll the chicken!

Ingredients:
6 boneless skinless chicken breasts (about 5 oz each)
1 box (10 oz) frozen cut spinach, thawed, well drained
2 oz fat free cream cheese, softened
¼ cup shredded Parmesan cheese
½ teaspoon dried basil leaves
1 clove garlic, finely chopped
¼ cup fat-free egg product
12 stone-ground crushed wheat crackers, about 1/2 cup (We needed a lot more than 12 crackers to make ½ cup)
1 teaspoon dried basil leaves
½ teaspoon pepper
1 cup pasta sauce
¼ cup shredded mozzarella cheese (1 oz)

Directions:
1. Heat oven to 375°F. Spray 13x9-inch (3-quart) glass baking dish with cooking spray. Between pieces of plastic wrap or waxed paper, place each chicken breast smooth side down; gently pound with flat side of meat mallet or rolling pin until about 1/4 inch thick.

2. In medium bowl, mix spinach, cream cheese, Parmesan cheese, 1/2 teaspoon basil and the garlic until blended.

3. Spread about 1 tablespoon spinach mixture over each chicken breast; roll up tightly. If necessary, secure with toothpicks.


4. In small shallow bowl, place egg product. In another small shallow bowl, mix cracker crumbs, 1 teaspoon basil and the pepper.

5. Dip each chicken breast into egg product; coat with crumb mixture. Place seam side down in baking dish.

6. Bake uncovered 20 minutes. Pour pasta sauce over chicken; sprinkle with mozzarella cheese. Bake 10 to 15 minutes longer or until thermometer inserted in center of chicken reads 165°F. Remove toothpicks from chicken before eating.

Yum! Enjoy!

Festive Ornament Ball Wreath

I came up with this idea a couple years ago and finally had a chance to try it. While it looks super easy, it took a lot more thought and time than I originally planned, but it turned out so cute in the end!

Supplies:
Ball ornaments $2.00 (score from the thrift store over the summer)
Floral wire $3.00
Wire wreath $1.40
Silver tinsel $1.00
TOTAL: $7.40

First, wrap your wire wreath with tinsel to cover all the green. Tuck the ends in. If you want to add a ribbon to hang your wreath, do it now so you can see where you need to leave space.

Kitty has a slight obsession with tinsel, so he helped out
Once the wreath is wrapped with tinsel, I cut 5 inch pieces of thin floral wire to attach each ornament to the wreath.
Starting with the largest ornament balls, slip the wire through the ornament top and then wrap around the wreath. The tighter you can get the ball on the wreath, the better. You want it tight so it won't move around and change position.

You also may need to hot glue each ornament ball to it's topper if they start to pop off. Mine stayed on, but I've heard they can pop off pretty easily.

Slowly add more ornaments around the wreath until it fills up. I used the smallest balls at the end to fill in small spaces that were left. It might take some tweaking to get it how you want it. It also helped for me to actually hang the wreath on the back of a chair while I worked so I could see how it would look hanging up.


And the Chrismukkah version for our house...

Sunday, November 22, 2009

Take out the trash!

This is an idea of what our man room/office usually looks like. Trash overflowing in the garbage can, trash on the floor next to it, and things aren't recycled. I'm sick of it!

So I came up with an easy solution to fix this.


First, I printed out the words "TRASH" and "RECYCLE" in a fun font.

Then I cut them out and put them up against a window to trace the letters on the back of the page using a pencil. Color in every letter with the pencil.

Tape the words to the plastic bin. I used a mechanical pencil with no graphite sticking out to trace over the letters. You will be able to see how the pencil on the other side will be transferred to the bin. Once your pencil letters are transferred, use a marker or paint pen to color over them. I used a silver Sharpie and it took 2 coats to get the color dark enough.

Done! A quick, easy solution for organizing garbage and I hope it works!


Friday, November 20, 2009

Mouthwatering Lowfat Pumpkin Angel Food Cake

I just made this as a treat for work and it was a big hit! Lots of compliments! : )

The cake turned out perfectly moist and it's a great low fat dessert idea instead of some of those really unhealthy holiday pieces.

Ingredients

* 1 (18 ounce) package angel food cake mix (the 1 step mix)
* 1 (15 ounce) can pumpkin
* 1 teaspoon pumpkin spice
* 1 cup water
* 1 (8 ounce) container Cool Whip, thawed

Directions

1. Mix the ingredients together.


2. Bake as directed on the angel food cake box. You can pretty much use any size pan you want like a bundt, 9x13, or cupcake pan. My angel food cake had directions for how long to bake each size of pan.

4. When cooled, top cake with Cool Whip.


I meant to take a pic of this once it was cut, but my camera is on it's last leg and gave me a hard time. When you have to slam your camera against the table after every picture to get it to turn on, it's time for a new one! Recs, anyone?

Anyway, enjoy!

Pioneer Woman book signing!


Those of you who are into the blogging world may have heard of Pioneer Woman (AKA Ree Drummond). She's a very talented blogger, photographer, cook, and writer going on a tour of the country to promote her cookbook. She had a book signing at the Barnes & Noble near me, so I had to go check it out.

It was madness! This is only about half the people that were there. There was a huge crowd behind me and on the second floor that wrapped around.

I got there early at 6:00 pm so I would have a good spot for the book presentation. The seats were already all taken. She came out at 7:30 for a quick Q&A session and then began signing books. Umm...apparently, we were supposed to pick up numbers for the book signing, but I didn't know this because I came in the back door of the store. So I got #191 even though I was there pretty early.

So we got in line and waited. And waited...


The line hardly moved.


I really regretted wearing heels after a full day at work and an hour at the gym.


We waited even more.

4 hours later, my back was killing me and my feet were screaming. I couldn't handle it anymore and had to get home so I could sleep for a few hours before work the next day. I was really sad I didn't get to meet her, but I was just too tired.

However, I heard she did stay to meet every last person so I applaud her for that. There are a lot of authors and celebrities that leave a signing while there's still a line and end up with a lot of disappointed fans. Although I didn't get my book signed, it was a fun experience and I wish Ree the best on the rest of her tour and congratulations on her success!

Sunday, November 15, 2009

Honey? Are the dishes clean or dirty?

I don't know about you, but this is a common problem in our house. Just last week we accidentally ran the dishwasher twice in one day because someone didn't know if the dishes in there were clean or dirty.

Solution? A cheap, fun sign!

Supplies:
paint
paintbrush
thin wood rectangle or other shape
mod podge (clear)
scrapbook paper
magnet stickers
optional: cute stickers or glitter

Paint your wood shape. It would also be cute to use an apple or cherry shaped piece of wood since it will be hung in the kitchen.


Measure and cut out scrapbook paper to cover the wood piece. Spread mod podge on the back of the scrapbook paper.
Press paper onto your wood piece. Make sure to smooth out any wrinkles or bubbles. They're hard to get out later and it's worth it to spend the extra time on this.

When your paper dried, put a thin coat add mod podge on the top of the scrapbook paper. Don't worry, it will dry clear. Just make sure you don't leave any big globs of mod podge.

Add your "clean" and "dirty" letters with a marker or print them using a fun font on the computer. If you print them, use the same mod podge method to glue them on.

Some cute stickers or glitter would be cute if you want to dress up your sign.

When everything dries, add 2 small magnets to the back. I bought the magnet sheets that are sticky on one side, so they're super easy to use.

Hang it up and beg your family members to use it!

Related Posts with Thumbnails